
Creme Brulee Banana Cheesecake Recipe with Caramelized Topping
Crème Brûlée Banana Cheesecake Recipe | Best Dessert
Description
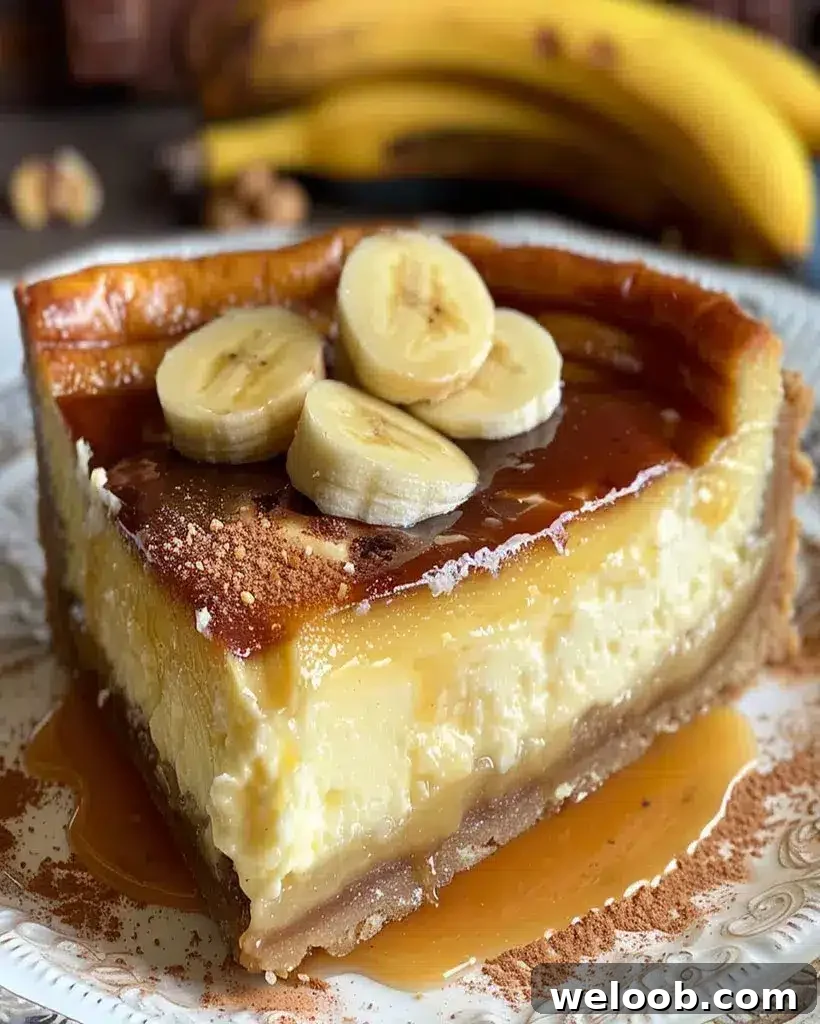
If you love rich, velvety cheesecake with a banana twist and the signature crackly sugar crust of crème brûlée, this Crème Brûlée Banana Cheesecake is made for you. It combines a smooth banana-infused cheesecake filling with a caramelized sugar topping for a delightful contrast of textures — silky interior and crisp golden shell. The recipe is approachable for home bakers and makes a show-stopping dessert for special occasions or weekend treats.
Why You’ll Love This Recipe
- Silky and creamy: A luxuriously smooth cheesecake with a gentle banana flavor that doesn’t overpower.
- Caramelized sugar topping: A classic crème brûlée finish adds a satisfying crunch and elegant look.
- Perfect for any celebration: Works great for birthdays, holidays, or dinner parties.
- Make-ahead friendly: Chill overnight for the best texture and easier slicing.
Ingredients
For the Crust
- 2 cups graham cracker crumbs
- ½ cup unsalted butter, melted
- ¼ cup brown sugar
For the Cheesecake Filling
- 24 oz (680 g) cream cheese, softened
- 1 cup granulated sugar
- 3 large eggs
- 1 teaspoon vanilla extract
- ½ cup sour cream
- ½ cup heavy cream
- 2 ripe bananas, mashed
- 1 tablespoon cornstarch
For the Crème Brûlée Topping
- ⅓ cup granulated sugar
- 1 tablespoon water
Garnish (optional)
- 1 banana, sliced
- Ground cinnamon, for dusting
Instructions
Step 1: Prepare the Crust
- Preheat the oven to 325°F (160°C).
- In a bowl, combine graham cracker crumbs, melted butter, and brown sugar. Stir until the crumbs are evenly coated.
- Press the mixture firmly into the bottom of a 9-inch springform pan to form an even layer.
- Bake for 10 minutes, then remove and let cool while you prepare the filling.
Step 2: Make the Cheesecake Filling
- In a large bowl, beat the softened cream cheese with the granulated sugar until smooth and creamy.
- Add the eggs one at a time, mixing well after each addition for an even texture.
- Stir in vanilla extract, sour cream, and heavy cream until fully incorporated.
- Mash the ripe bananas thoroughly and fold them into the batter, then add the cornstarch and mix until smooth and lump-free.
Step 3: Bake the Cheesecake
- Pour the cheesecake filling over the cooled crust and smooth the top.
- Place the springform pan inside a larger baking pan. Pour hot water into the larger pan to create a water bath about 1 inch up the sides of the springform pan. The water bath helps prevent cracks and ensures even baking.
- Bake 60–70 minutes, or until the center is mostly set but still slightly jiggly — it will continue to firm as it cools.
- Turn off the oven and leave the cheesecake inside with the door slightly ajar for 1 hour to cool gradually.
- Remove from the oven and refrigerate for at least 4 hours, preferably overnight, before adding the topping.
Step 4: Prepare the Crème Brûlée Topping
- When the cheesecake is well chilled, sprinkle an even layer of granulated sugar over the surface.
- Lightly moisten the sugar with 1 tablespoon of water — this helps the sugar caramelize evenly.
- Using a kitchen torch, slowly caramelize the sugar until it becomes golden and crisp. If you don’t have a torch, place the cake under a hot broiler for a minute or two, watching carefully to avoid burning.
- Allow the caramelized sugar to cool and harden for a minute or two before serving.
Step 5: Serve
- Garnish with banana slices and a light dusting of ground cinnamon if desired.
- Slice with a sharp knife (run under hot water and wipe dry between cuts for clean slices) and serve chilled.
Expert Tips
- Use room-temperature ingredients: Room-temperature cream cheese and eggs blend more smoothly and reduce lumps.
- Water bath is key: Baking in a water bath adds gentle, even heat and prevents cracks in the cheesecake.
- Mash bananas thoroughly: For a velvety texture, make sure the bananas are well mashed with no large pieces.
- Caramelize just before serving: For the best crisp top, burn the sugar right before you serve the cake.
- Clean slices: Warm and dry your knife between cuts for neat, professional-looking pieces.
Serving Suggestions
This cheesecake pairs beautifully with a cup of espresso or a vanilla latte. Add a drizzle of dark chocolate sauce or a dollop of whipped cream for an extra indulgent presentation. Fresh banana slices and a sprinkle of cinnamon add a bright finishing touch.
Nutritional Information (per serving, 10 servings)
- Calories: 470 kcal
- Total Fat: 30 g
- Carbohydrates: 45 g
- Protein: 8 g
- Sugars: 32 g
Storage and Leftovers
How to Store
- Refrigerate the cheesecake in an airtight container for up to 5 days.
- Do not caramelize the top until just before serving to keep the crust crisp.
How to Freeze
- Wrap the cheesecake (without the caramelized topping) tightly in plastic wrap and place it in an airtight container. Freeze for up to two months.
- Thaw overnight in the refrigerator, then add the sugar and caramelize the top just before serving.
Frequently Asked Questions
Can I caramelize the sugar without a torch?
Yes. Use your oven broiler on high for 1–2 minutes, watching closely to avoid burning. A torch gives more control, but the broiler works in a pinch.
What if I don’t have a springform pan?
A deep cake pan can work; line it with parchment to help remove the cheesecake. Be aware that slicing and presentation may be less tidy than with a springform pan.
Can I use overripe bananas?
Absolutely. Overripe bananas are sweeter and offer a stronger banana flavor, which complements the creamy filling nicely.
How do I prevent cracking?
Baking in a water bath, avoiding overmixing the batter, and cooling the cheesecake gradually in the turned-off oven all help minimize cracks.
Final Thoughts
This Crème Brûlée Banana Cheesecake blends the best elements of two beloved desserts into one elegant, delicious treat. It’s creamy, flavorful, and impressive without being complicated. Make it for a celebration or a special weekend dessert — it’s sure to become a favorite.
Did you try the recipe? Share your experience, tips, or photos — we’d love to hear how it turned out. Happy baking!