
Quick Valentine’s Day Cookie Recipes Ready in Minutes

Valentine Cookies In A Snap
Valentine Cookies In A Snap are charming decorated heart cookies baked together so you can snap them apart and enjoy a single piece at a time. They’re ideal for gifting, party favors, or a festive Valentine’s Day treat.

I’m excited to share this idea — it had been waiting in my drawer for the perfect moment, and with the holiday of love right around the corner, an overdose of hearts felt like the right way to celebrate a little labor of love.

What are Valentine Cookies In A Snap?
These are small to medium shortbread-style cookies cut into shapes (hearts in this version) and lightly “glued” together before baking. After baking and cooling, each grouped cookie can be held as one piece and snapped apart so friends and family can take one cookie at a time. The technique lets you bake creative patterns while preserving the individual cookie shapes and sharp edges.
Quick overview of the method
- Prepare a sturdy shortbread-style dough and cut shapes with cookie cutters.
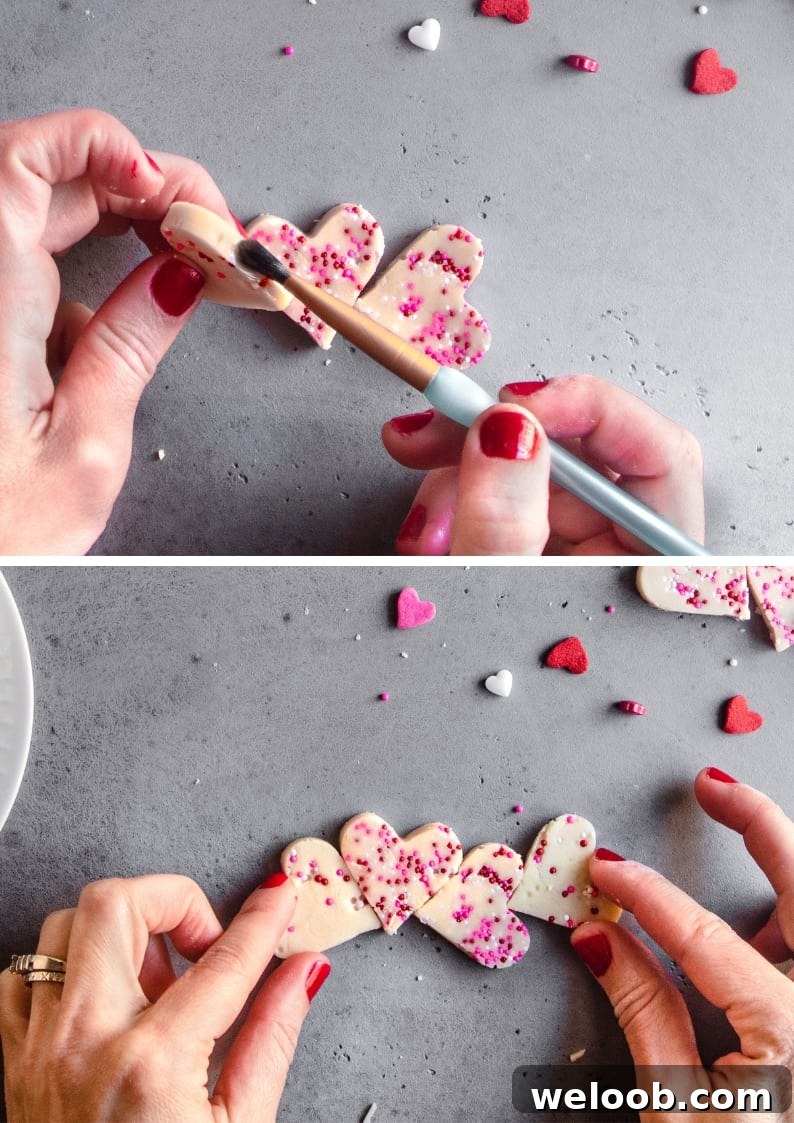
- Lightly brush the edges where pieces will meet with beaten egg (use very little).
- Arrange and press pieces together in the design you want on the baking sheet.
- Bake, cool completely, then decorate as desired.
- Hold the assembled piece and snap individual cookies apart to serve.



Creative variations
Hearts are lovely, but this technique works with any shape. I’ve used squares decorated like baby blocks to spell a name for a baby shower. Other ideas: sports balls, Easter shapes, zoo animals, or playful bachelorette-theme designs. The method is flexible — use your cutters and imagination to create themed assemblies.
There are almost unlimited possibilities. Have fun, experiment, and if you improve on the idea, I’d love to see what you create!

Tips for best results
- Use a simple shortbread-style dough and swap regular granulated sugar for confectioners’ sugar. This helps cookies keep sharp edges, reduces browning, and gives a cleaner snap.
- Add sprinkles at the last moment and mix gently so colors don’t bleed into the dough. Avoid overworking the dough.
- When brushing the joining edges with egg wash, use a very small amount. Too much egg can leak between pieces during baking and will be visible afterward.
- If you’re working with large shapes, consider cutting the cookie edge with a sharp knife so the pieces fit together smoothly before gluing them.
HAPPY BAKING!!!

Related cookie ideas
More cookies you might enjoy: Chocolate rolled cookies and Peanuts peanut butter cookies. These are great options if you want different textures or flavors to pair with your snap cookies.
Recipe: Valentine Cookies In A Snap
A crisp shortbread-style cookie that holds its shape for clean, smooth snaps and sharp edges.
Yield
About 24 small cookies (depending on cutter size and arrangement)
Time
Prep: 10 minutes • Cook: 10 minutes • Chill dough: 1–2 hours (or overnight) • Total active time: ~20 minutes
Ingredients
- 1/2 cup confectioners’ sugar (about 56 g / 2 oz)
- 1 stick unsalted butter, softened (113 g / 4 oz)
- 1 1/3 cups + 1 tablespoon all-purpose flour (about 170 g / 6 oz)
- 1/4 cup sprinkles (about 42 g / 1.5 oz) — optional
- 1 beaten egg (for brushing the joining edges)
Instructions
- In a stand mixer fitted with the paddle attachment, combine the confectioners’ sugar and softened butter. Beat on medium until smooth, about one minute.
- Reduce speed to low and add the flour. Mix just until the dough forms large lumps — do not overmix.
- Turn the dough out onto a clean surface, add sprinkles if using, and gently bring the dough together. Avoid overworking it so sprinkles retain their color.
- Place the dough between two sheets of parchment or baking paper (each the size of a cookie sheet). Roll to about 1/3″ to 1/2″ (8–12 mm) thick.
- Chill the rolled dough in the refrigerator for a minimum of 1 hour, or overnight for firmer dough and crisper edges.
- When chilled, preheat the oven to 350°F (175°C) and line a baking sheet with parchment. Cut shapes using your preferred cutters.
- Dip a small pastry brush into the beaten egg and use only a tiny amount to brush the edges where pieces will meet. Arrange the cookie shapes on the baking sheet and gently press edges together to form your pattern. Leave about 1″ (2.5 cm) between assembled designs.
- Bake on the middle rack for about 10–11 minutes, until the bottoms are lightly golden. Watch closely to avoid excessive browning.
- Remove from the oven and let cool completely on the baking sheet so the pieces set. Once cooled, decorate if desired, then snap and serve.
Enjoy assembling and sharing these playful, shareable cookies. They make a delightful presentation and a fun way for guests to sample a single cookie at a time.